|
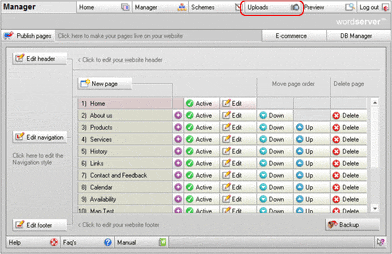
To set up your own FTP uploads, please see the details in the Uploads section, which you can get to from any screen by clicking on the Uploads button, as highlighted in red below. To use the wordserver uploads method, please see below for a description of how to download a shortcut to your computer to enable you to upload images and other files to your website.

From the Uploads screen click 'here' highlighted in red to download the shortcut to your computer You will be provided with three options: Open, Save or Cancel. Choose the Save option and save to a convenient location on your PC – Windows Desktop is a ideal place as it provides quick access when you need it. After your download has completed, you will be provided with an option to Open, Open Folder or Close. Choose Close. The short cut will now be stored in your chosen location. You need do this only once unless you lose the shortcut or want to install it on another PC or laptop.
To upload images and other files, find the short cut. If it is on your desktop, a quick method to go to the desktop is to hold down the Windows Key (in the same row on your keyboard as the spacebar) and click the letter M. If you wish, you can give the shortcut a new name by finding it and then right clicking the current name, clicking 'Rename' and typing a new name of your choice.
To begin uploading, double-click the shortcut. The first time you do this, you will see a security warning. This file is perfectly safe to use and will not harm your PC. If you do not want to see this message again, un-tick the box 'Always ask before opening this file'. Click the Open button. This will open Windows Explorer and you will be logged on to your website for uploading images and files. If you cannot see your hard drive in the left pane, click the "Folders" button on Windows Explorer toolbar.
You should see three folders in the right pane. These are the folders for storing your images and files on the server. The folders are repeated towards the bottom of the left pane. To open a folder, double click on it. You should see your existing images or files, or a blank white area if nothing has been previously loaded.
To upload new images or files, locate them on your hard drive (or network drive) and either drag and drop or copy and paste into the appropriate folder on the server:
For images on general pages:
support.wordserver.co.uk>htdocs>uploaded_images
For files, e.g. PDF, MS Word documents:
support.wordserver.co.uk>htdocs>uploaded_files
For images on database pages:
support.wordserver.co.uk>htdocs>database_images
A copy will be put on the server and the original image or file will be unchanged. You are also able to overwrite, download and delete existing images or files on the server.
Any image or file you upload will automatically appear in your wordserver editor when you next edit or create a page. If you already have a page open for editing in another window, you will either need to close and re-open the page if you have made any edits or refresh the page if you haven't. If you refresh the page without saving any edits you may have made, you will loose those edits.
[ top of page ] |


